When you’re a busy entrepreneur and marketer on the go, sometimes you need to edit your photos on the fly, especially for social media posting. That’s when it comes in super handy to be able to remove the background from a photo using a smartphone.
After all, you don’t always want to post a selfie pic in front of a storefront or a restaurant. Maybe you want to switch the background to another setting or even to a solid color?
Whether you like it or not, visual design is a big part of content marketing these days. You’re expected to produce decent looking images even if you don’t have design skills. And that’s where these apps really save the day.
Today’s modern options have made removing the background from a photo MUCH easier. You don’t even need to trace outlines anymore since algorithms do the heavy lifting.
It happens to me enough times that I found a smartphone app called Adobe Photoshop Mix. It’s a tool that works well and is very simple to remove the background from a photo. Even better, it’s a free download from both the iTunes and Google Play stores.
Step 1 – Set Up Adobe Photoshop Mix
Download and install the app on your smartphone. The first time you open Photoshop Mix, you’ll need to either log in to your Adobe Cloud account or create a free account from within the app.
Step 2 – Choose an Image
 Within the app, choose the plus sign to start a new project. The plus sign will open a new screen that will allow you to choose where you will select a photo from, including your smartphone, Facebook, Dropbox, etc.
After you choose an image, it will appear on your screen. If the image needs to be cropped, select the crop tool from the lower left side of the screen. The crop tool will open and you will 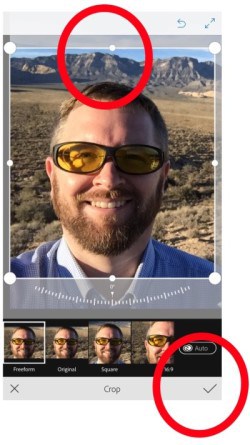 have a few choices listed at the bottom for crop templates. The freeform option gives you the most flexibility as you can position the outlines where you want to crop just by touching them and dragging with your finger like you would a mouse.
Once the area is selected, tap on the check mark in the lower right to save the crop. You’ll be redirected back to the main project window.
Step 3 – Remove the Background
To remove the background from a photo, you’ll be using the Cutout tool. The Cutout tool allows you to select which parts of the picture stay and which parts will be removed.
 When you tap on the Cutout tool, it will load in “Add” mode by default. You will see the “Add” in the lower left of the screen. “Add” means that everything you trace will be kept in the image while everything else will drop out.
Again like with the crop tool, use your finger like you use a mouse with your computer. Warning: this takes practice to perfect!
Trace with your finger around the part of the image that you want to stay in the photo. As you trace, you’ll see the area that you’re removing fades while the area you are keeping stays bright and in focus.
The first pass of the cutout tool removes the majority of the background that you no longer want. However, you’ll need to do some clean up.
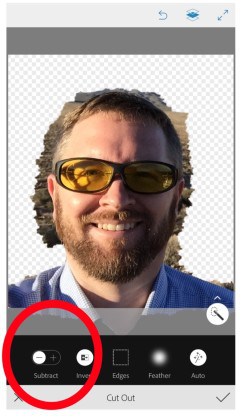
Step 4 – Clean Up
To remove the rest of the background that is close to the area you want to keep, change from the Cutout tool in Add mode to the “Subtract” mode. To do this, touch “Add” in the lower left section of the screen. The Subtract mode removes areas that you trace with your finger.
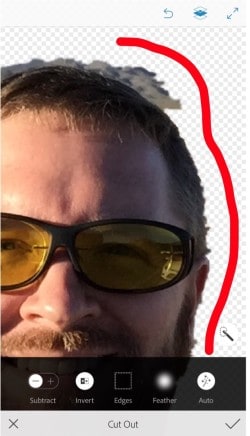
I’ve found that it’s easiest to zoom in to clean up any remaining background that you want to remove. To zoom in, take TWO fingers and pinch inwards. This will zoom in on the image. Reposition the image as needed with your two fingers, and drag the image into position. Be sure not to use ONE finger! One finger will delete/remove areas on the screen.
If you make a mistake, use the Undo arrow at the top of the screen.
Now that you’re zoomed in, move one finger around the areas that you want to clean up and do a more detailed job. This took me a few tries. I had to use the Undo button at the top a few times until I got everything removed. Once you are satisfied with your image, save the edits by touching the checkmark on the lower right of the screen. Your changes will save and you’ll be returned to the main menu.
Step 5 – Bonus: Layering
Adobe Photoshop Mix also allows layers, so you can add a new background to your image.
To add a background layer, tap on the layers button at the top of the app and when the layers option is visible on the screen select the + to add a layer. You are then given the option to choose an image from your phone, Facebook, Adobe cloud, etc. 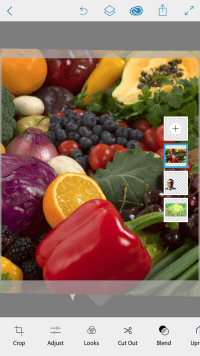
I selected another image from the photo roll which opened a new layer on top of my original image, but I used my finger to drag the layer with my face on it above the new background and voila, I am in a vegetable stand.
Once you have completed your edits you can save them by touching the arrow up button which will give you an option to save to your camera roll. This will look slightly different on an Android device.
 Back to You
I use Adobe Photoshop Mix for all kinds of projects, most of which become Instagram and Facebook posts. It is the fastest way for me to snap, tweak and post all from one device.
Did you find this tutorial helpful? What other graphic tools do you love to use on your smartphone?
Many many thanks for sharing with us the great tips. I learn from this blog how can I remove the background from a photo. I am so happy to find your blog.
That’s really interesting. I’m a Photoshop addict but hadn’t thought of using it like this on my phone.
Thanks Jeff I was using Cut It Out from the play store. Works great too and free. I am going to compare the two.
Thanks Pauline, we really appreciate your feedback! I’ve never heard of Cut It Out–great tip, we’ll have to check it out. Feel free to touch base with us again to let us know which app you prefer. 🙂
Thanks for mentioning it Pauline. I will check it out, always looking for good mobile tools.
Now you’ve given me an excuse to get on the creative suite bandwagon. How much space does one get with Adobe cloud? I will have to try this one to see how it works. I’m impressed you can add layers, something Lightroom users wanted for a long time. Thanks Jeff!
Lew, you get two GB for free making it worthwhile to set up the account. I don’t actually store my versions in the cloud, I save them on my Phone before uploading them to my favorite Social Media accounts.
Great app to share with us. It’s impossible to stay on top of everything as new options are coming out all the time. Thanks for thinking of us and I’ll add this to the toolbox .
Wish this was free on my desktop as I do nothing on my phone, other than download the photos from it to my desktop. This sounds relatively easy to do and with so many people sharing their photos on a variety of platforms it sounds like this tool and your tutorial will be helpful to lots of people. Will tell my daughter about it too! Thanks Meghan and Jeff!
I have to admit most of my photos are still taken with my DSLR. Need to starting using my smartphone more. Thanks
We use the DSLR for a lot of our photography, but the smart phone cameras are getting so advanced that they take great shots too.
This is going to help me in so many ways. I had no idea this was possible. Thank you!
Wow – thanks for sharing this in tutorial fashion. Downloading the app as I type!! Looking forward to giving it a try.
Wow, very cool. I hope to remember this next time I need it! Thanks for sharing!
I never saw photoshop & I am just getting started with word swag. My partner does mosy of our graphics & is great with Canva. I cn tell this is an excellent tutorial & I’m sure will be quite helpful to many.
This is great, Meghan! I’m SO technologically challenged, but even I can understand this! Going to play with it this weekend. Thank You!
Thanks for the step by step instruction, Meghan! I just downloaded the app. I think I heard of this one before but forgot about it. I will try it. =)
What a great App to have free access to, WOW! Thanks too for the easy to follow instructions. I shall be sure to pass them forward to friends with Smartphones.
That’s really neat. I have to revisit this app. My daughter mentioned this app to me too. Sounds really cool. I downloaded photoshop app a while back but I think they revised it. I’m going to try this one! That’s for sharing the steps.
It’s a really easy to use app. I plan on sharing a few more over the next few weeks. Are there any tasks that you would like to do on your phone that you would be interested in reading about?
Wow, that is pretty cool.. however, I wish they had it for desktop as I hate.. did I mention I HATE working on my phone.. too dang small and not as precise.. and many many other reason.. however desktop cost is an arm and a leg, no thank you… plus since I am not a graphic designer, I don’t need it as much so it isn’t worth it. I did download the app and will try it soon, thanks!
Glad you are going to check it out. I use my phone for everything, so I am always checking out new apps.
That’s really interesting. I’m a Photoshop addict but hadn’t thought of using it like this on my phone. Wow! Putting the cut out imagine on a fairly busy new background would make it less necessary to have the cut out done perfectly. Thanks for sharing this.
The Adobe Photoshop Mix app has only a few features, which is good and bad. Simpler to use, but not as robust. One of my least favorite things to do is remove the background from a photo. The best thing about this blog is that now I can bug Jeff to do that for me, lol! Thanks for the comment Beth, appreciate it!